
Introduction
For the past three years I’ve been exclusively developing on an amazon EC2 instance. With a moderate yearly cost of $120/year, this has afforded me many intrinsic benefits;
- Not tied to a device.
- Laptop bricks? Light it on fire while your session remains safe and sound in the cloud.
- Develop on any OS with a terminal and SSH
- Seemlesly transition between devices
- Infrastructure Bennies
- 25 Gbs download speed
- EBS snapshots
- AMI - rebuild your dev box in seconds
- Easily stage code

Intended Audience
If you are already using the following;
If you are not… The above links are also introductions to the subjects. Basic competency is all that’s needed. I will be sharing my configs and most used commands.
Backstory
I had originally embarked on this journey after two key events in my career;
- While working for Authentic8, my Macbook Air’s HD corrupted. This rendered me useless to my company for over a week. I was forced to update my OS, which broke our app build entirely. I do not know what code I lost. Sucks for my company, I still get paid.
- Later, while contracting, a random person spilled coffee on my Macbook Air. A LOT. R.I.P. laptop. R.I.P. my week. Sucks for me, I dont get paid.
The following was my answer to being a wreckless power user.
First Try, Cloud Based IDEs
My first inclination was to just offload all of my infrastructure. First it was services like CodeEnvy and Divio. Which were quite good, even at the time. Mind you, this was in late 2016; I’m sure these services have improved immensely. I was just either too stubborn or too bad at adapting to their constraints. I moved on pretty quickly.
Second Try, KindleBerry Pie
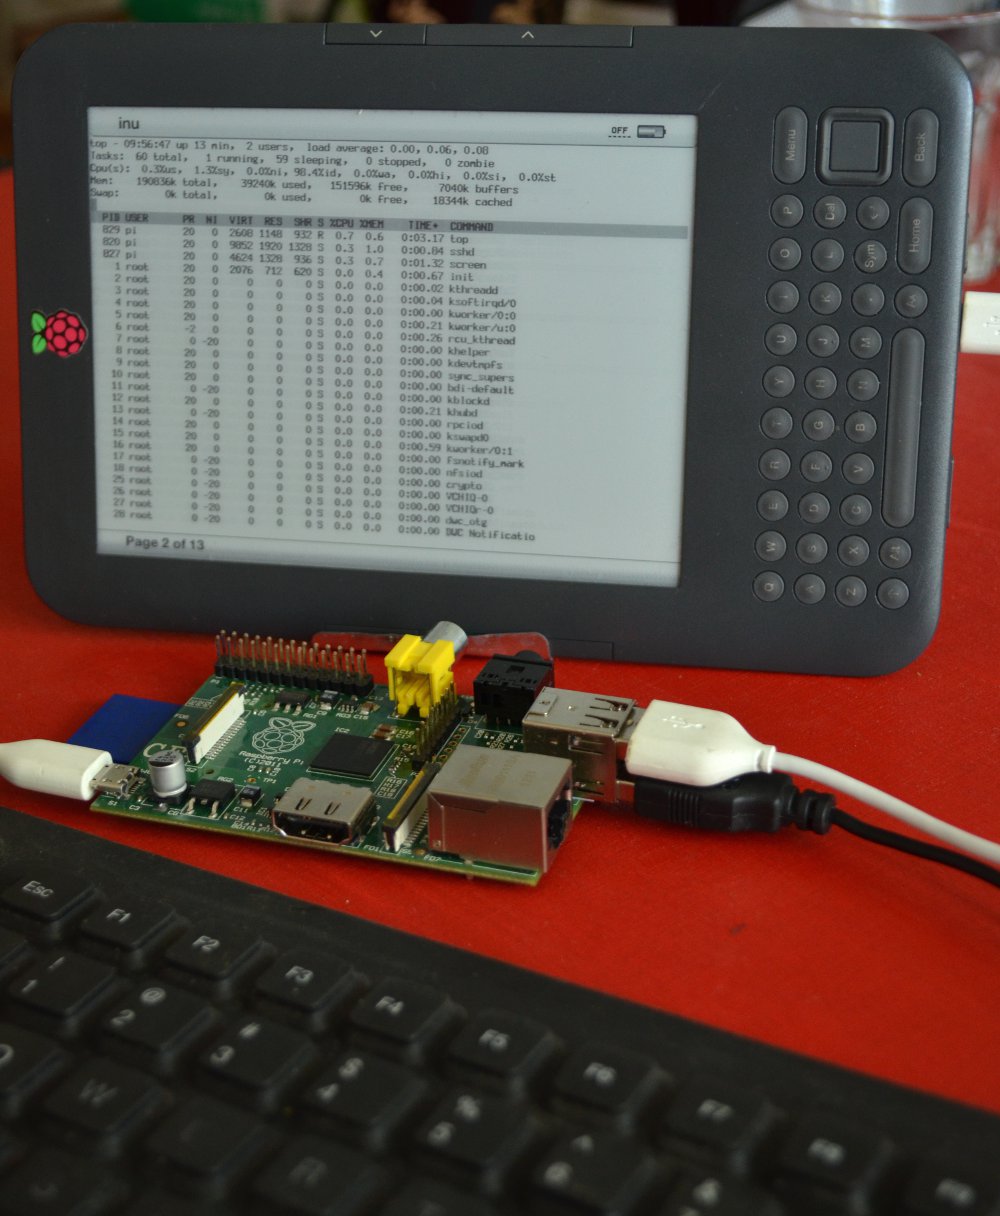 In 2013 I found an amazingly innovative article about this individual who made their kindle into a laptop. This was my first thought when my laptop got ruined. I had some moderate success, but as a Fullstack Developer it didn’t really make sense. Here’s why;
- Kindle SSH’d into a raspberry pi
- Keyboard connected to raspberry pi
- Raspberry pi shares screen session w/ kindle
- Phone Connects to UI for a MOBILE only experience
Also… at the time, Docker wasn’t supported on ARM like it is now, so I spun up a micro EC2 instance for my docker host. This was fragile and wildly impractical. Hipster AF but not worth.
I decided to just skip the kindleberry pi and buy a cheap android tablet I could ssh w/.
Landing on ec2
Let me be clear: I use ec2 out of convienence. I strongly consider you to caution against vendor lock in at every turn. For me, tThere haven’t been any competitive offerings for the price. As soon as there is one I can migrate pretty easily.
Do you have one? let me know!
Configuring the Tools
This is not meant to be a tutorial on how to use these tools, just a glimpse into my setup. There are SO many tutorials out there… many linked throughout this post.
Vim
I’ve been using vim for around 5 years now and will never use another IDE given a choice. It is ubiquitous. It is infinitely customizable. Configuring a “modern feeling” setup requires almost no work with vim 8 plugin support.
You will find SO many opinions on the “MOST ULTIMTE VIM SETUP IN ALL OF HISTORY”. You can and should go down those rabit holes… but there is little you NEED. Lets take a look at the key parts of my minimalist vim8 setup.
Compiling vim 8 (not that scary)
Vim 8’s plugins make it worthwhile to install and depending on your linux distribution it may be unavailable. There is a very thorough walkthrough on this by YouCompleteMe. For me, on Ubuntu, it was as simple as the following;
 #Remove old vims
sudo apt remove vim vim-runtime gvim
# Clone and configure vim
cd ~
git clone https://github.com/vim/vim.git
cd vim
./configure --with-features=huge \
            --enable-multibyte \
            --enable-rubyinterp=yes \
            --enable-python3interp=yes \
            --with-python3-config-dir=$(python3-config --configdir) \
            --prefix=/usr/local
# install w/ checkinstall
sudo apt install checkinstall
cd ~/vim
sudo checkinstall
# Set defaults
sudo update-alternatives --install /usr/bin/editor editor /usr/local/bin/vim 1
sudo update-alternatives --set editor /usr/local/bin/vim
sudo update-alternatives --install /usr/bin/vi vi /usr/local/bin/vim 1
sudo update-alternatives --set vi /usr/local/bin/vim
# Check your vim version
vim --version
#Should echo "VIM - Vi IMproved 8.2" ...etc
Installing Plugins
We want the following plugins;
- NerdTree - browse your filesystem like a modern IDE
- YouCompleteMe - Code completion
- Vim Airline - Status bar plugin (same thing as powerline, i had trouble installing this)
Any vim plugins in the ~/.vim/pack/*/start/ directory will be automatically. So all we have to do is clone into these projects.
mkdir -p ~/.vim/pack/vendor/start/ && cd ~/.vim/pack/vendor/start/
# NerdTree
git clone git@github.com:preservim/nerdtree.git && \
   vim -u NONE -c "helptags ~/.vim/pack/vendor/start/nerdtree/doc" -c q

# Vim Airline
git clone git@github.com:vim-airline/vim-airline.git && \
  vim -u NONE -c "helptags ~/.vim/pack/vendor/start/vim-airline/doc" -c q
# Vim Airline Themes
git clone git@github.com:vim-airline/vim-airline-themes.git
# YouCompleteMe
git clone --recursive https://github.com/Valloric/YouCompleteMe && \
  cd YouCompeteMe && \
  ./install.py
Tmux
Tmux is the thing that;
- Allows me to share screen sessions between devices
- Allows me to create different windows/tabs
You can find a crash course here. This tutorial is quite good. All I can tell you is you need tmux, or some kind of screen multiplexer, if you are gonna make working in the command line viable.
Auto Session Attach
I got sick of managing sessions, I really just wanted one. I tend to use windows/splits instead of sessions. The following will seemlessly start tmux and attach to a session for you;
# ADD TO YOUR BASH PROFILE
# Session Auto Start
if [[ -z "$TMUX" ]] then
  tmux_session='#OMZ'

  if ! tmux has-session -t "$tmux_session" 2> /dev/null; then
    # Disable the destruction of unattached sessions globally.
    tmux set-option -g destroy-unattached off &> /dev/null

    # Create a new session.
    tmux new-session -d -s "$tmux_session"

    # Disable the destruction of the new, unattached session.
    tmux set-option -t "$tmux_session" destroy-unattached off &> /dev/null

    # Enable the destruction of unattached sessions globally to prevent
    # an abundance of open, detached sessions.
    tmux set-option -g destroy-unattached on &> /dev/null
  fi

  exec tmux new-session -t "$tmux_session"
fi
Tmux + Vim
Definitely worth checking out how you can get these two to play nice - thanks Derek Prior. You even spell your name properly.
Zsh / Oh My Zsh (optional)
Tons of opinions out there regarding which shell is best and blah blah blah. ZSH offers me two benefits that keep me around;
- Advanced Auto Complete
- Themes
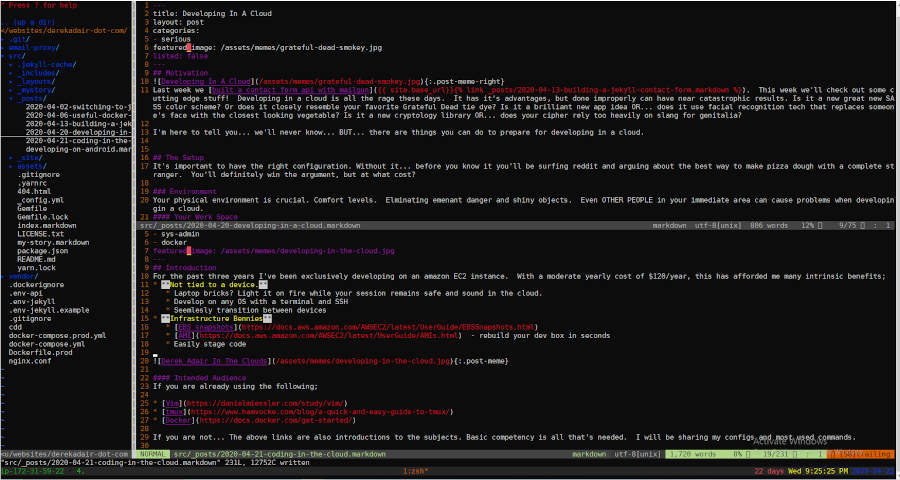
I prefer these things but its definitely not required. You can absolutely skip these things. Oh My Zsh has tons of customization options. I used powerlevel9k to build mine.
Here is a picture of my setup
Jason Wilders nginx-proxy
It can be a pain to manage vhosts/ports on a VPS. There are tons of solutions out there for this type of thing; but none more eloquent than Jwilders nginx proxy. It also comes with a Lets Encrypt Companion for drop in SSL support. You can read up on why we do this on Jason Wilders blog.

Requirements
- Your host must be publicly reachable on both port 80 and 443.
- Check your firewall rules and do not attempt to block port 80 as that will prevent http-01 challenges from completing.
- For the same reason, you can’t use nginx-proxy’s HTTPS_METHOD=nohttp.
- The (sub)domains you want to issue certificates for must correctly resolve to the host.
- Your DNS provider must answer correctly to CAA record requests
- If your (sub)domains have AAAA records set, the host must be publicly reachable over IPv6 on port 80 and 443.
Configuring the proxy
There are many different ways to leverage this, which are detailed in the projects README. There is a high level configuration of nginx-proxy/letx-encrypt where you can (basically) clone and go.
git clone https://github.com/evertramos/docker-compose-letsencrypt-nginx-proxy-companion.git nginx-proxycd nginx && cp .env.sample .env<- should work by default for you./start.sh
Whats this doing?
- Checks your .env file is set
- creates a network for your nginx-proxy containers (webproxy by default)
- (I dont use this) creates a network for services
- downloads the proxy nginx template
- Updates local docker images (nginx-gen/nginx-proxy/nginx-letsencrypt)
- Starts your proxy
Using the proxy
Docker Environment Variables
VIRTUAL_HOST- nginx-proxy routes requests from this host to your containerVIRTUAL_PORT- (default:80) what port is your service listening on?LETSENCRYPT_HOST- Host to assocaite w/ letsencrypt. Must be the same as VIRTUAL_HOSTLETSENCRYPT_EMAIL- Email notifications about expirations etc
Gotchas!
- nginx-proxy throws 503 error - Nginx cannot find your container listening on the proper port. It’s either;
- Your service is not running properly (code errors)
- Wrong
VIRTUAL_PORT VIRTUAL_PORTnot exposed
- nginx-proxy throws 502 error - This happens when nginx-proxy cant find your service. Either;
- Service is not on the
webproxynetwork - Service is not running at all
- Service is not on the
Tips
-
Use a wildcard DNS to avoid adding records for each of your apps.
-
Configure httpauth by adding a file named the same as your
VIRTUAL_HOSTinto./nginx-proxy/data/htpasswdwith a valid htpasswd - Restart proxy w/ zero downtime (loads new configs)
docker exec -it ${NGINX_WEB} nginx -s reload`Where
${NGINX_WEB}is your proxy container name, which in the original .env file is set as nginx-web. -
Renew Lets Encrypt Certificates
docker exec nginx-letsencrypt /app/force_renew - Having trouble? delete all of it and spin it up again!
 #./nginx-proxy
 docker-compose kill && docker-compose rm
 docker system prune -f --all
 ./start.sh
Hello World Example This will spin up an example container that is running a service on a domain you own. REMEMBER. You need to have your DNS set up properly and pointing to your servers IP.
docker run --rm -it \
    -e VIRTUAL_HOST={YOUR_DOMAIN} \
    -e LETSENCRYPT_HOST={YOUR_DOMAIN} \
    -e LETSENCRYPT_EMAIL={YOUR_EMAIL}\
    -p 80 \
    --network=webproxy \
    rancher/hello-world
Wrapping up
There was a lot covered here. Between my toolbelt configuration and nginx-proxy/lets-encrypt you should be good to go in your VPS development efforts. While this setup has posed several unique challenges for me, it’s been well worth the bennies.
What did you think? Any questions, comments or suggestions please dont hesistate to reach out!
Next Week
Next week I will be supplementing this post with a guide on how to develop on an android tabletin this environment!